This juice was inspired by a smoothie I had for breakfast in a hotel at Brighton. The recipe used Orange juice (when I asked the chef for it), however I used Grapefruit for this recipe (as it has an intense tangy flavour . I'm not a great fan of Banana smoothies as I find them creamy, however the addition of citrus cuts through the creaminess and lends the smoothie a tangy taste. Be warned , this drink is delicious, healthy and will have you wanting more.
This recipe has inspired me again to replace the Banana with Plantain next time. Let's start mixing...
Ingredients
1 large Passion fruit
Juice of 1 Grapefruit
1 Banana
Method
Cut the Passion Fruit in two and scoop the seeds and juice into a bowl.
Mix the Grapefruit juice and Passion fruit together.
Strain the seeds using a colander into a blender.
Using the back of a spoon press the seeds to get rid of any juice into the blender.
Pour 50ml of water over the Passion fruit seeds (to ensure you have extracted all the juice) into the blender.
Peel the Banana and add it to the blender.
Blend everything into a smooth silky consistency.
Transfer into a smoothie jar and refrigerate for an hour.
Enjoy!
All photos and recipes are by the owner of this blog.
Find more inspiring recipes on my YouTube channel, 'Ndudu by Fafa'. Don't forget to subscribe and share.
Bite me! Listen to the crunch and savour the sweet softness of each bite.Be careful! Don't burn your tongue. Who doesn't like hot doughnuts? It's a firm favourite in Ghana and it's found in most street corners across the country , particularly at breakfast and lunch time. I enjoyed this on my last visit to Ghana and craved it today. Nigerians refer to the doughnuts as Puff Puff, the Congolese Mikate, Liberians as Kala, most francophone states refer to it as Beignet and there a similar versions known as Mandazi in Eastern and Southern Africa.
There are two types of Bofrot, Boflot, Togbei (affectionately called in Ghana). I've written and videoed the recipe for the wet version. This recipe is the dry version, which has a 'bready consistency' and a beautiful outer crunch.
Enjoy!
Ingredients
250g of Plain flour
20g of butter
7g of yeast
2 tablespoonful of Sugar
1 teaspoon of Vanilla extract or Grated Nutmeg
75ml of warm Water / Milk
A pinch of salt
1 litre of Sunflower oil
For a richer texture you can use an egg (this is optional), however it's my preference.
Tip
The doughnuts brown quickly when you use milk.
Sugar
Adding too much sugar prevents your dough to rise. If you want to add more Sugar, you need to double the amount of yeast you use.
Add the Salt, Flour, Yeast, grated Nutmeg, Butter and Egg to a mixing bowl.
By hand
With clean hands mix everything together and slowly add the warm water.
Keep mixing till well combined and form a ball with the dough.
Transfer the dough to a clean, floured surface and knead it with the heel of your palm (always pushing the dough away from you) for about 20 minutes. You need to achieve a glossy, smooth and shiny dough. This process is to activate the gluten in the flour, soften the dough and enable you to achieve a light and fluffy doughnut.
This process will make you burn a few calories as you'll be using your biceps. Great way to reward yourself after the hard work 😓
Using a Mixer
If you're like me and can't be bothered with exercising your biceps, then use a mixer.
Place all the ingredients in a mixing bowl, attach the bread hook and knead the dough for about 8-10minutes or until the dough has a glossy shine.
Once your dough has its shine, cover it with cling film and leave it to rise in a warm place for an hour.
Once risen transfer the dough to a floured surface. Divide the dough into 12 even balls, cover with an oiled cling film and leave it to proof for another hour.
Frying
Once your dough balls are risen to twice their size, pour a litre of Sunflower oil into a Wok and place on a medium heat.
Tip
Please ensure your oil is hot enough to fry but not scorching to burn the doughnuts quickly. This should take about 4 minutes on a medium heat.
Add the doughnuts to the oil (careful not to burn yourself); Using a long wooden skewer constantly turn the doughnuts for an even cook.
Once browned (this process takes about 5 minutes) use a slotted ladle and remove the doughnuts into a colander. Place the colander over a bowl for any excess oil to drip into. Alternatively transfer onto a blotting paper.
Serve warm with Hausa Kooko, Porridge, hot chocolate etc
All photos and recipes are by the owner of this blog.
Find more inspiring recipes on my YouTube channel, 'Ndudu by Fafa'. Don't forget to share and subscribe.
'Moinmoin' is a spiced steamed bean pudding , which is synonymous with most Nigerians.
Traditionally Moinmoin is steamed in the leaves of Thaumatococcus Daniellii (an amazing fruit that turns anything sour; sweet), which lends its unique taste to the dish. The leaves are known as Waakye leaves in Ghana or Uma in Nigeria.
The process of making Moinmoin can be time consuming, as you need to soak the beans and take the skins off.
My first experience of making Moinmoin was a painful and rewarding journey. I soaked the beans overnight and painstakingly peeled the skin off each bean.
It was a time consuming experience and one I didn't ever wish to repeat.
I remember relating this experience to my Mum, and all I could hear was the echo of her laughter, quickly followed by her stern instruction of 'grab a pen and paper'.
Mum carefully explained how I needed to roughly blend the soaked beans, transfer it into a bigger bowl and add water, which will separate the skins from the beans. This quickened the peeling and eventually the cooking process.
I tried my Mums method and understood her chuckle at my expense. I've since enjoyed preparing Moinmoin using my Mums method, till I received a parcel from the Real African Food Company in 2016.
The parcel was a sample of their Moinmoin mix and a request for my honest feedback.
I gave my honest feedback on taste, texture and packaging and was so proud to see the end results. I received a few boxes in the post and knew the painstaking, peeling shenanigans of Moinmoin was over.
If you've been following me for a while, you'll notice I love twisting 'food', hence I decided to play with flavours and textures of the Moinmoin mix.
You know what? Let's make Moinmoin Scones as one does for an African inspired 'Afternoon Tea'.
Let me explain the reasoning behind the flavours. The Moinmoin mix has an earthy taste with accents of Paprika which works well with the Cheese and aromatic taste of the Rosemary.
The Moinmoin mix is gluten free as it's made from ground beans and it's a great addition to your picnics. The Moinmoin Scones can be refrigerated and used within a week. You can warm it up again in the oven either by wrapping it in foil or steam it in the oven (check method later in the recipe).
Traditionally when making Scones, one is advised against working the dough to activate the gluten in the flour. With this recipe this isn't a problem as the beans flour doesn't contain gluten.
To make this you need;
Ingredients
200g of Moinmoin mix
140g of grated Cheddar cheese
30g of grated cold butter
20g of finely chopped fresh Rosemary
1 levelled tablespoon of Baking powder
50ml of Milk or Water
1 beaten free range or organic egg
Salt to taste
To start
Pour the Moinmoin mix , salt and baking powder into a bowl. Mix everything together.
Add the grated butter and cheese
Now add the chopped fresh Rosemary
Mix everything together till you have a breadcrumb consistency, as shown below
I've used less butter for the recipe as the cheese also contains fat.
Add the milk and egg to the mixture. Using a fork mix everything together gently till well combined.
Cover the bowl with a cling film and refrigerate the mixture for about 10-15 minutes.
Preheat your oven to 180*c
When ready to cook, flour the surface of a chopping board (using the beans flour for a gluten free option)and roll the mixture out.
Tip
You can use plain flour for the surface, if you don't have any gluten allergy.
Using a round cutter, cut the Moinmoin mixture into sizeable portions.
Grease a baking tray or use a great proof paper to line your tray.
Place the tray in the middle of the oven.
Place a separate tray filled with 100ml of water at the bottom of the oven.
This will steam and bake the Scones at the same time, ensuring an even cook and a surface crust.
Bake for 25 minutes and remove from the oven.
You can enjoy the Scones either hot or cold.
This recipe works perfectly as a snack , starter or add a meaty sauce for a main dish.
All photos and recipes are by the owner of this blog. Find more inspiring recipes on my YouTube channel, 'Ndudu by Fafa', like this party Jollof rice recipe. Don't forget to subscribe and share.
I passed by my local grocer to pick a few ingredients and he just took delivery of the most scented basil I've ever smelt. After adding 2 generous bunches of basil to my list, ( with strict instructions by the grocer on how to preserve the basil), I said my 'thank you' and hurried to my car before I purchased more than I needed.
I was tired that evening to cook, hence I adhered to the grocers instructions ( don't refrigerate, place in a cool dark place) on preserving the freshly picked basil.
The next day the basil had wilted slightly and I needed to preserve the sweet almost perfume like smell of it.
The idea of infusing the basil into oil was the only logical way I could preserve the pungent smell, taste and the green colour.
To retain it's 'greenness' I blanched the basil in hot water for 30 seconds and quickly runned it under cold water (to stop it cooking further) and to retain it's green colour. Wow your guest by adding a couple of drops to your 'soup', 'salads' and fish dishes.
Ingredients;
300g of fresh basil
Half a teaspoon of Sauvignon blanc vinegar or malt vinegar.
Half a teaspoon of salt
500ml of olive oil, ( please don't use extra virgin olive oil) as it has a stronger taste and might over power the basil.
Method;
Wash your Basil under cold water.
Boil your kettle with water and pour the hot water in a bowl.
Dip the basil with stalks into the hot water for 30 seconds.
Remove the basil from the hot water and quickly dip it into an ice cold water for about 2 minutes.
Squeeze the water from the basil and place it in a blender.
Add the oil, vinegar and salt
Blend into a smooth mixture.
Using a muslin cloth and a smooth colander, placed over a bowl, pour the basil mixture into the muslin covered colander.
Leave it to gently strain ( it can take up to 12 hrs) and discard the chaff.
Pour your basil scented oil in a mason jar and refrigerate.
I have used the basil oil for my French toast this morning and it was amazing. All photos and recipes are by the owner of this blog. Find more inspiring recipes on my YouTube channel, 'Ndudu by Fafa'.
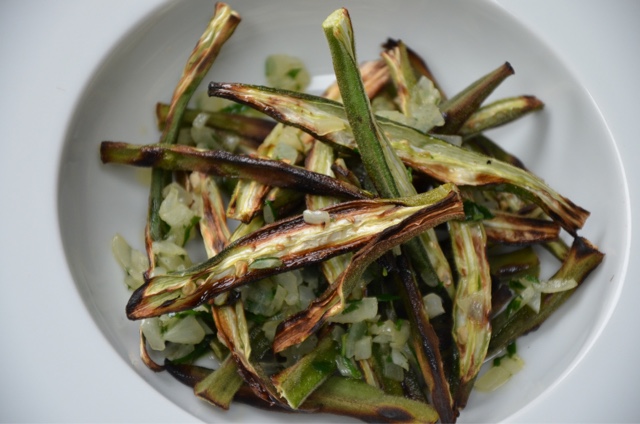
Okra, Okro, Ladies Fingers or Gumbo is rich in Vitamin B, C, Folic acid, Pottasium and Calcium. It' has a high dietary fibre, fewer calories and it's readily available in most grocers and supermarkets.
I first made this dish in 2014 and haven't looked back since. It's crunchy, smoky, delicious and acts as a healthy snack.
I usually add it to my Omelette or Salads and enjoy the crunch it offers.
This is an easy snack to make and works perfectly with a tangy sauce. Enjoy!
Cut the heads and tips off the okra and cut
lengthways
Place the Okra in a bowl, drizzle with 2 tablespoons
of olive oil.
Place a griddle pan on a medium heat.
Grill the Okra on each side for about 3-4 minutes and set aside.
In a saucepan, add the butter and Olive oil. Place the saucepan on a medium heat. Melt and heat the butter till it browns, but not burnt(Buerre noisette). Turn the heat to a lower setting and add the shallots.
Fry gently for 3 minutes (stirring frequently).
Add the Lemon zest and fry for another minute.
Add the vinegar and increase the heat. Reduce the
juice by a third, which should take about 3 minutes.
Add the Greek basil / Tarragon or your
preferred herbs, stir and remove from the heat.
Add salt and pepper to taste and serve.
To serve;
Add the sauce to a bowl and cover it with the grilled Okra. Drizzle the Okra with olive oil and serve with an optional Green chilli and Ginger blend
To make your Green chilli/ Ginger blend;
Roughly blend 50g of green Chilies/Ginger, 1 medium onion and a pinch of salt. Add a tablespoon of olive oil, mix and serve.
All photos ad recipes are by the owner of this blog. Seek permission before you use and always reference back to my page.
Dinner was grilled Harissa crusted Mackerel with new potatoes and I wanted something sweet.
I'm not one for sweet things , however there's a time a lady will give into their cravings for something sweet. I settled for hot Chocolate, using my Ghanaian Cocoa powder.
I was sipping my hot Chocolate and my thoughts escaped to my childhood
'You'll be late for school, stop playing with your Tea' (hot Chocolate made from Milo/Cocoa Powder or Bournvita').
'Why was every beverage named tea' and Mackerel, Salmon? Who am I kidding, I also described the above the same way , till I knew better 🙈
I had to smile at this memory, as I knew I wanted to distract my Mum to enable me freeze the rest of my hot chocolate.
Bless, I did give flimsy excuses of 'I can't find my bag or hide my school shoes etc (much to the annoyance of my Mum) to buy me enough time to freeze the 'hot chocolate'. At times one was caught in the act 🙈 most times I managed to add
the 'chewing stick' for the perfect lolly or use my spoon.
All this kerfuffle was for one to enjoy an Ice lolly after school.
I was half way through my hot chocolate and decided to freeze the rest in homage to my childhood. Thankfully I had some 'chewing stick ' and bingo I was looking forward to my Chocolate Ice lolly the next day.
CHEWING STICK
Ingredients
Indulgent option
100ml of double cream
200ml of whole milk
3 heaped tablespoons of Cocoa powder / Milo
1 teaspoon of brown Sugar
My childhood ingredients
2 heaped teaspoonful of Milo or Cocoa Powder
1 teaspoon of brown sugar (or more depending on your preference)
3 tablespoons of evaporated milk
200ml of hot water
Indulgent Method
Mix the Cream, Sugar and Milk together in a saucepan
Place the saucepan on a medium heat and warm up for 5 minutes
Add the Cocoa powder and mix well.
Childhood method
Add the Milo/Bournvita/Cocoa Powder to a mug.
Add the sugar and milk and stir.
Add the warm water and stir till smooth.
Pour your preferred chocolate drink method into a teacup and insert a chewing stick or a lolly stick.
Enjoy!
All photos and recipes are by the owner of this blog.
Find more inspiring recipes on my YouTube channel,'Ndudu by Fafa', like this Ghanaian doughnut recipe. Don't forget to subscribe and share
INSTAGRAM:NDUDU BY FAFA YOUTUBE:NDUDU BY FAFA TWITTER:NDUDUBYFAFA
Chapli Khebab originates from Pershawa in Pakistan and it's a firm favourite of mine. I love making friends and learning new dishes from their cultures. I first had this made by a friend Ayesha, sometime last year and decided to treat myself to a few today.
Traditionally the Chapli Khebab (Kabab) is fried or grilled on a charcoal barbecue, however I chose to grill mine.
Some recipes do ask for the inclusion of Pomegranate seeds, Corn starch and Garam Masala. I've omitted the aforementioned ingredients from this recipe as I used what was available in my spice larder. However if you wish to add the omitted spices add a tablespoonful each to the spice mix.
What I love about this type of Khebab is the inclusion of Tomatoes. The Tomatoes give the Khebab a moist texture even when cold.
Chapli Khebab (Kabab) can be enjoyed with steamed Rice, Salad, as a Burger or in a Sandwich. Let's start cooking...
Ingredients
Spice mix
1 tablespoonful of Coriander seeds
1 tablespoonful of roasted Cumin seeds
1 tablespoonful of Ginger powder
1 tablespoonful of Paprika
1 tablespoonful of Garlic powder
6 Cardamom pods
1 teaspoonful of Red Chilli powder
6 Cloves
1 teaspoonful of milled Black Peppercorns
500g of minced Lamb
1 large finely diced Onion
I large diced Tomato
15g of chopped fresh Coriander
1 free range or Organic egg
Salt to taste
Juice of 1 Lemon
Oil to fry
Method
Spice mix
Add all the ingredients with the exception of the Coriander seeds and blend into a smooth powder.
Add the Coriander seeds and pulse.
The aim to have a rough spice mix texture, as shown above.
Place the minced Lamb, Lemon juice in a bowl and add 3 tablespoonful of the spice mix.
Tip
Reserve the rest of the spice mix in an airtight container and freeze it till a recipe requires it. Freezing the spice mix retains the freshness and aroma of the spices. When needed, just warm it up in a dry frying pan to release its oils.
Add the egg, diced Onions, chopped Coriander, diced Tomato and salt to taste.
Knead the mixture for about 5-6 minutes till you have a smooth and silky texture, as shown above.
Moulding
Place a bowl with 3 tablespoonful of Olive oil next to you. Dip both fingers into the Olive oil and scoop a handful of the Lamb mixture.
Roll the mixture into a ball and using both palms, press the mixture into a flat disc shape and set aside.
Frying
If you choose to fry your Chapli Khebab it's best to use Ghee , however you can use any oil of your choosing.
Heat the oil up in a frying pan and carefully place each Chapli Khebab in the oil.
Fry for 2 minutes on both sides and set aside till you've fried all the mixture.
Grilling
Preheat your grill to 200*c and place your Chapli Khebab on an oiled baking tray.
Grill for 8 minutes and it's ready to serve.
Best to serve this with Green salad and a cold glass of fresh Watermelon juice.
Find more inspiring recipes on my YouTube channel,
'Ndudu by Fafa'. Don't forget to subscribe and share.
All photos and recipes are by the owner of this blog.